|
ZOOM
|
We use ZOOM to display our screen.
We
can view your screen when you give permission. |
|

|
FlexiHub enables
us to control remote instruments connected to USB or serial
ports. Your COM1 becomes our virtual COM1, etc. This
powerful facility eliminates expensive on-site visits. |
|
Installation
& Startup
Backing up data files
Gdiplus.dll not found
Installation/USB key
problems
Invalid license type error
License key exchange
Mcary5.exe
installation issues
Multiple
instances (sessions)
OLE2.DLL
is not a valid Windows image
P-E Lambda 19
installation
Transferring
FilmStar
to new computer
Updating USB License Keys
Unexpected error;quitting
Windows
7 (Vista) compatibility
Windows
Remote
Desktop
Input/Output
Black
scroll bars
Dialogs off-screen, possible freeze
File open/save options
File List Dialogs
File Properties
(NTFS)
Grid keyboard shortcuts,
etc.
Organizing data
directories
Graphics
FSPlot
bitmap/gradient modes
Bold fonts don't look good?
Comparing
%R and
%T spectra
Changing axes
quickly
Diabatic
transmittance
scale
FilmStar dialog fonts
Font size
multiplier
FSPlot 5.0 to 6.0 update
FSPlot Customizer
FSPlot Tutorial I - Appearance
FSPlot Tutorial II - Legends
FSPlot Tutorial III -
Annotations
FSPlot Tutorial IV - Formulator
Modifying
FSPlot legends
Mouse pointer
disappears
Multiple
spectra in
FSPlot
PowerPoint
presentations
Size
of Print Graphics
printout
General
Configuration not
saved
FilmStar
Administrator
Importing illuminants
Reporting problems to
FTG
Software
Subscript out of range error
BASIC,
Excel, etc.
Aborting a
BASIC program
Adding audio
to
BASIC
Bandwidth
calculations NO VBA
C++
How-to
Converting spectral
data I
Converting spectral
data II
DDE (dynamic data
exchange)
DDE / BASIC / Excel
Deleting rows in
Excel
Embed BASIC in
MEASURE, Scantraq
Excel (as client)
reliability
Excel
DDE doesn't work!!
Excel
XLSM file doesn't work
Excel VBA dialogs in
BASIC
Excel VBA issues
FilmStar and Excel
FilmStar class references
Getting
started with MS Office
Laser Focus World April 2014
Saving multiple spectra
OCX in BASIC?
BASIC Tutorial I -
Getting
Started
BASIC Tutorial II -
Advanced
BASIC Tutorial III - Examples
Saving Excel data without the
macros
Saving tolerancing data in Excel
VBA, FilmStar objects &
processes
MEASURE/Scantraq
ActiveX servers
Agilent Cary
UMA/UMS
Agilent/HP 8453 setup
Angular dispersion
AR reflectance setup
Automating
measurements (PDF)
Bandpass Calculator
BASIC FileSave bug
Cary UMA doesn't connect
Cary UMA
Support
CIE Color with diode-array
COM port in Windows
7 XP Mode
Configuration bug
Eliminating Side 2
Reflectance
Embedding BASIC code
FTIR stability
Function FileOpen disabled
error message
Global COM port
change
Identifying bad data
Illuminants editor
Import PE spectra
(.sp)
Lambda 2 (10/12/14)
cable
Lambda 19
installation
Lambda
20/40
timeout error
Lambda
800/900 common beam filters
Lambda Error
-241 (Missing hardware)
Lambda Bio/XLS
installation (Scantraq)
Lambda Server error (950/1050)
Log files
Mcary5.exe
installation issues
Nicolet (Thermo
Scientific) FTIR support
Noise issues
Ocean Optics support
OLIS Excel spectra
OLIS Upcycled 983
OMT Solutions
PE ARTA/TAMS support
PE spectrophotometer
communicating?
PE Spectrum 10
(FTIR) support
PE
Spectrum 10 sample files
Photon RT (Essent
Optics) support
PIKE autosampler support
Plotting multiple
spectra
Problem with %R
baseline scan
Saving multiple spectra
Saving spectra in two file formats
Scan macros
Scan vs. time
Spectra Collector
Spectrum GX/2000
setup
Spectra vs. temperature
Standard files
Startup Method
StellarNet Support
Time Series
Too many points in Standard file
Unsupported
instruments
Wavelength
calibration
Wavelength
List Generator
Report
Generator
Graph not displayed
Including date/time
in report
Report Organizer
Tutorial I - Getting Started
Tutorial II - Advanced
Tutorial III - MS Word
|
DESIGN
Absorptance in
layers
AI replacing coating engineers?
Air and substrate
'layers'
AR at all wavelengths (unobtainium)
AR for two
substrates
Bandwidth compensation
for R/T vs. t
BASIC
Function Calculate
Bruggeman step by
step
Changing plot
type
quickly
Collector to targets
Coating both sides
Color Matching
Combining
multiple
designs
Contour data
import/export
Contour plots
Correcting
measured spectra
Correcting thickness
errors
Cutting Edge
Coatings
DLS
'ActiveX component...' error
Design Recorder
Designing
for
FWD and REV incidence
Designs
don't work on new computer
Double Dispersion
Edge filter
performance
Electric field
algorithm
Eliminating Side 2
Reflectance
Ellipsometric plots
Ellipsometry when k~0
Encrypting designs
Extended materials
Flip Fixture
Optical Monitoring
Flip-flop example
Gedankenspektrum
Methods (PDF)
HunterLab spectra
import
Illuminants editor
Index as a function of
thickness
Index fitting with $NK
Index Formulator
Index Limits
Index temperature
dependence
Index vs.
wavelength
Index tolerancing
Index variations in
layers
Index variations (My
TiO2)
IndexSolve.bas
video
IndexSolveCL.bas
update
Interactor custom
plot
Interactor monitor
spectra
Interactor
Smith chart module
L*a*b* tolerancing
Layer Error Analyzer
MacAdam ellipses
Many layers
Many materials
MCalc: import designs
Minus filter
designs
Mixed materials
Multiple substrates
Non-uniform coatings
Optimizing two
designs
Optimizing
phase shift
Overflow error
Phase plots
Photon RT (Essent
Optics) support
Photopic response
curves
Piecewise n&k determination #1
Piecewise n&k
determination #2
Plotting Fwd and Rev
reflectance
Plotting multiple
spectra
Reflectance vs.
thickness and wavelength
RGB Comparator
Reliability of
inverse-synthesis
Rugate analysis
Saving Tolerancing
Data in Excel
Spectra Collector
Stack Mode
Target Generator
TFCalc: import
designs
Thickness profile
THK variables
Tolerancing
Tolerancing
algorithm
Tooling factor
correction
Tooling factor global
search
User-defined
functions
Veeco Spector OMS
support
Wedged substrates
When is a layer massive?
ZEMAX
coating files
INDEX
Alloys (AlGaAs) and mixed materials
Ambiguity in n,k
for single films
Bruggeman approximation
Extract n,k from
graphs
Double Dispersion
'Film Only' Absorbance?
Group Velocity
Dispersion (GVD)
Import MCalc
materials
Import n,k Tables and Functions
Import Excel n,k
tables
Index as a function of
thickness
Index fitting with $NK
Index Formulator
Index Functions updated
Index variations (My TiO2)
IndexSolve.bas video
IndexSolveCL.bas
update
Invalid procedure call or
argument
Lorentzian dispersion
revisited
Merge R & T spectra
n&k for Films on metallic
substrates
n&k Oxides Step by Step
Optical glass (Schott,
Ohara, etc)
Piecewise n&k determination #1
Piecewise n&k
determination #2
Plotting index
functions
RefractiveIndex.INFO
Refractive index data (Luxpop)
Schott filter glass
database
Si3N4 case study
Solving for k with
known n
Sopra database of optical indices
Determining k in filter glasses
Temperature dependence
TFCalc: import materials
Wavelength
List Generator
ZrO2 case study (inhomogeneity)
MONITOR
Coating run-time
Combining layers
Intellemetrics FilmMaker
FilmMaker
material properties
Glitch at company X
Leybold Monitoring Report
Monochromator
bandwidth
Veeco Spector OMS
support
Wavelength
calibration
FilmStar
Database
Accessing
the database
Adding Scan command
to database
Connecting to
enterprise
databases
Database
capacity
Design value list in
Spectra database
FileMaker spectra
database example
FilmStar
Workbook
Hidden
Workbook
Saving multiple spectra
Tutorial I - Getting Started
Tutorial II - Multiple Spectra
Tutorial III - Constraints
|
|
|
|
When running a BASIC program
from the IDE (editor) it's easy to quit: just click the red
END icon.
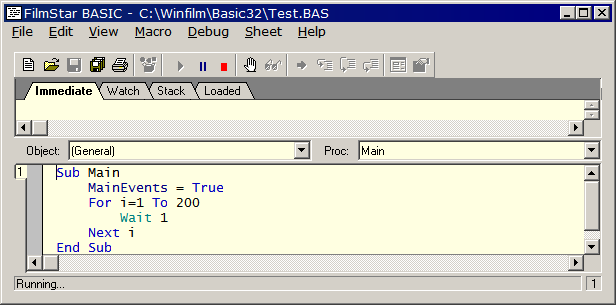
When running from a macro
button add line MainEvents = True to enable the Abort BASIC
menu command shown below. This works in all FTG Software programs.

While this capability has
been available for some time (DESIGN 2.30.1305 and MEASURE (Scantraq)
2.30.1101) we thought it was too easy to inadvertently stop a lengthy
macro (e.g. multiple spectra measured over a wide temperature
range). This issue has been addressed in DESIGN 2.61.3052, and
MEASURE (Scantraq) 2.51.1347 with a new confirmation dialog: click
Yes to quit BASIC or No (default) to continue. Note that
quitting may not be immediate.
Back
to top
FilmStar DESIGN
calculates absorptance vs. wavelength and absorptance vs. thickness
(differential absorptance) for specified layers. While most designers
never use these
capabilities, they are important for solar cells and other active
devices. Calculations
can also be applied to the design of laser-resistant coatings. Note that Side 2
Compensation = FWD ignore/include Side 2.
Sample file absorp.zip
contains FILM Archives
absorp1.faw & absorp2.faw, Excel 97 model absorp.xls and DESIGN
Workbook absorp.vts.
Integrating differential absorptance over layer thickness gives total
absorptance for each
layer at the specified wavelength. (This corrects a previous definition
where results were
normalized by total absorptance.) Methods for verifying results are
given here.
Back to top
Using ActiveX server
audio.exe based on
Microsoft library mci32.ocx, it is
very easy to add audio to FilmStar (Scantraq) BASIC programs. A typical
application is informing QC technicians when a scan is completed. A
sample BASIC
program plus support files are provided in audio.zip.
Back
to top
Need to optimize a
coating for two substrates?
This can be accomplished by
changing the substrate index during each iteration. An example is given
in bbar2sub.zip.
Copy the .bas files to c:\winfilm\basic32; copy bbar.faw file
to
c:\winfilm\designs; copy bbar2sub.xls to c:\winfilm\workbook.
Open FILM
Archive bbar and click Evaluate...
Workbook (<F3>)
to
activate the FilmStar Workbook. Close any open worksheets and open
bbar2sub.xls.
Just click Optimize... Optimize
(<Ctrl+O>)
to proceed. Back
to top
A UK user reported that grid scroll
bars in dialogs such as the Data Table (<F8>) sometimes turn black
thereby making scrolling inconvenient. We were not able to reproduce
this error, but the user reported that our suggested fix solved the
problem:
File...
Configuration... Preferences... <Grid Style>... Grid... Type... Classic.
Back
to top
Thanks to Charles
Anderson at St Gobain for supplying the following
step-by-step tutorial on utilizing FilmStar as an automation server for
applications developed in C++.
It is very easy to
create an MFC automation C++ client that uses FilmStar
DESIGN (MEASURE) as an automation server. To do this :
- Using Visual C++
Studio create a new MFC application using MFC AppWizard (.exe). In step
3 check the Automation checkbox.
- With the Class Wizard
create a new class. That is, select the "Add Class" button and
afterwards select "From a type Library". A file selection dialog box
appears. Files appear withe the extensions "tlb olb and dll". However,
change this to all files and go to the Winfilm folder. Select the
Design1_32.exe file and select the Open button. A Confirm Classes
dialog appears with _clsMain and _clsBasic as the new C++ classes and
Design1_32.cpp and Design1_32.h as the files that will implement the
classes. Select the OK button and the classes are created.
- To use the classes
somewhere in the application create instances of the new classes. That
is add the lines :
_clsBasic
filmStarInterface;
_clsMain filmStarProgram;
For the _clsBasic
class (the _clsMain is the same) add the lines
if
(filmStarInterface.CreateDispatch(_T("FtgDesign1.clsBasic")))
{
// success
}
else
{
// problem
}
Note that automation
ProgID is called "FtgDesign.clsBasic". The
program is now ready to call the methods such as with the lines :
CString
m_design("4G 40M");
filmStarInterface.SetAngle(
60.0);
filmStarInterface.SetDesign(m_design);
filmStarInterface.Calculate();
filmStarInterface.DataCopy();
That is all there is
to it. Back
to top
Cary UMA doesn't connect
Even though MEASURE is not visible,
it is possible that a previous instance of Mcary5U.exe was not
terminated and has not released the Cary driver. In that case you
can open Task Manager and delete spurious copies of Mcary5U.exe
under Processes.
Quick alternative: Download
KillMcary5U.exe to your desktop. This deletes one or more
instances.
Coating
both sides
Users familiar with other software might erroneously conclude that DESIGN does not have a way to input
Side 1 and Side 2 layers. Instead, DESIGN offers the more powerful
capability of treating substrates as Massive Layers, thereby
allowing multiple substrates with films on some or all sides. Referring to
Setup.. Film Indices, entrance medium AIR is 1.0 and exit
medium SUB 1.0.
Combining
layers in MONITOR
When importing a design containing
parentheses, MONITOR expands groups and combines layers of the same
type: '1H 1H' -> '2H'. In some cases you don't want that to happen.
To prevent combining, before saving in DESIGN, expand the design in
the Layers Editor with 'Edit.. Combine Layers' UNCHECKED. Then save
the design or FILM Archive for loading into MONITOR.
Configuration not
saved
Your computer does not
retain capacity settings, preferences or file locations? Probably you
are in an organization with overly restrictive IT policies.
File.. Configuration
entries are stored in *.ini files in C:\Winfilm\Config or
C:\Scantraq\Config. These are sometimes not saved because users do not
have appropriate permissions. The problem can be seen by right-clicking
on an .ini file name in Explorer and examining Properties.. Security.
If it is not possible to edit Permissions and add Write, contact your
IT manager to fix the issue. We suggest that you also demand full
rights to update (reinstall) FTG programs.
FilmStar MEASURE
performs the following calculation in order to correct raw
spectrophotometer measurements.
Standard * (Sample -
Baseline)/(Reference - Baseline)
With a modern
instrument where the baseline is reliably zero, this calculation is not
normally required in transmission. It is, however, required in
reflection measurements.
Hitachi and Shimadzu users who cannot use MEASURE can perform similar
calculations in DESIGN on imported spectra. While the calculation is
readily performed in FilmStar BASIC, you can also use the FSPlot
Formulator to evaluate a formula over an entire spectral range. The
process goes like this:
a. Import measurements
and convert to the same wavelength range by using Sub DataConvert.
b. Use the FSPlot Formulator to correct the spectrum. Assuming that
Baseline data is in column B, Reference data in column C, Sample data
in Column D and Standard in Column E, the corrected spectrum is given
by the following formula. Once everything is set up correctly, pressing
<F9> runs the formula without showing the formula editor.
F =
E*(D-B)/(C-B);del B;del B;del B;del B
c. After
inspecting the plot, click
Edit...Copy Data to copy a corrected spectrum to the clipboard. (The
"del" commands remove unwanted columns C-F.) Warning: a spectrum
will be clipped if the data goes above or below graph limits. Try -10
to 110 to make certain that clipping is avoided.
A BASIC
macro encapsulating the above steps is easily developed. BASIC
Sub PlotDataCopy
copies FSPlot spectra to the clipboard. Back to
top
Suppose you have a
column of data, say a spectral weighting function, corresponding to a 1
nm interval. You want to copy and paste this into a FilmStar Workbook
model, but prefer to convert it to a 2 nm interval in order to speed up
calculations. This task is readily accomplished with the following
Excel VBA program:
' Excel VBA code
to delete every other line beginning at StartRow
Const StartRow = 4 ' starting row number
Sub Main()
Dim s$, i&
i = StartRow
Do Until Cells(i, 1) = ""
If Val(Cells(i, 1)) Mod 2 = 1 Then Cells(i, 1).EntireRow.Delete
i = i + 1
Loop
End Sub
If you use the macro recorder to
clear a spectral range, it only applies to a range of the same size
and position. The following shows a more general way to clear a
range; you only need to specify the upper left cell location ULeft$,
for example "$A2".
Sub ClearList(Byval Sheet$,
Byval ULeft$)
On Error Resume Next
Sheets(Sheet$).Select: Range(ULeft$).Select
Range(Selection, Selection.End(xlToRight)).Select
Range(Selection, Selection.End(xlDown)).Select
Selection.ClearContents
End Sub
Back
to
top
This error typically
occurs after installing FilmStar on a new computer and copying
previous designs and data files. The problem is that settings in
c:\winfilm\config\design1.ini were not transferred.
- Check directories in
File...Configuration...Directories.
- Check values in
File...Configuration...Capacity. It is possible that previous data
files expect larger data arrays than currently allowed.
- Check entries in User
Index Functions, Macros, and the Workbook.
A convenient procedure
is to save the original design1.ini
(measure.ini, scantraq.ini) to floppy or USB stick on the original
machine and copy it to the new machine. Then, if the FilmStar data
directories on the new machine are different from the original, open
design1.ini in Notepad and modify paths via global search and replace. Back to
top
|
FIXED 13
Sep 18...Off-screen dialogs are automatically reset.
FilmStar saves size and
position settings for several dialogs. This can lead to
off-screen windows and freezes when, for example, disconnecting a laptop
from a higher resolution monitor. Actually the program
is still active and
the dialog can usually be closed with <Esc> or <Alt+C>.
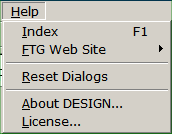
Click Help...Reset Dialogs.
Should that fail use Task Manager or
EndFTGprocs to end processes and open
..\Winfilm\Config\Design1.ini in Notepad. Delete window
coordinate lines under [Configuration], and save. Example:
TargetsWindow=0
9547 5445 29690 27080 0 0
Upon restarting DESIGN,
dialogs are reset. Windows
coordinates are also in [MONITOR], [CRYSTAL], and [INDEX]
sections in Design1.ini as well as Measure.ini. Hint:
Click Reset Dialogs before disconnecting a laptop from a
high resolution monitor. |
|
Yes it does! DDE
requires brackets around commands. Otherwise the system hangs up. VBA
format should be as follows:
Sub Main()
ch& = DDEInitiate("DESIGN1", "Main")
DDEExecute ch&, "[Fred;]"
DDETerminate ch&
End Sub
Names used in DDEInitiate are as
follows: DESIGN1, MPE983,
MPE19AX, MHP8453, MH3410, MCARY5, MCARY5U, MPE950, MPE1050.
Click here for
information about DDE with FileMaker. Back
to top
We were puzzled when an Excel XLS
workbook was saved as XLSM and failed to work. An example can be
found here.
We assumed it had to do with ActiveX
communication, but the Excel bug revealed itself as
something else. Saving RunDESIGN97.xls as RunDESIGN97.xlsm changed
button names from cmdCalculate and cmdQuit to
ButtonCommand1 and ButtonCommand2.
With hundreds of
millions of users, we wonder how an obvious bug like this wasn't
fixed. (We were using Excel 2010 and it is possible that the bug was
fixed later.) Note that RunDESIGN2007.xlsm illustrates a different
approach for connecting with DESIGN.
Note added March
2012: Users with many materials
should use Stack Mode
instead of Extended Materials.
Setting
Film Indices (in File
Configuration Capacity) to a number n > 52
places DESIGN into Extended
Materials mode. Since
designs in this mode are
incompatible with normal designs, the facility should only be utilized
if more
than 52 materials are actually required in one design! In
normal
operation, letters A-Z (+ a-z when n > 26) indicate film
materials. When n
> 52, letters are replaced by numbers enclosed in square
brackets with the
numbers corresponding to those in the Film Indices editor. That is,
.06502H .08876L
.53248H .25093L
is replaced
(replacement is NOT automatic) by
.06502[2]
.08876[1] .53248[2] .25093[1]
where the Film Indices
editor looks like
Back
to top
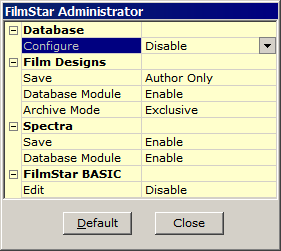
| The FilmStar
Administrator enables managers to control access to features in DESIGN,
INDEX and MEASURE. Examples: preventing QC technicians from adjusting
scan speeds, preventing optical coating technicians from modifying thin
film designs.
The Administrator
dialog is accessed in the Help menu in DESIGN and MEASURE.
Administrator status is enabled via a Security ID Module programmed
accordingly.
The 'Author Only'
setting is utilized in conjunction with NTFS
File Properties.
Please contact FTG
Software for further information.
Back to top
|
DESIGN Administrator
|
It appears the bug was introduced
in Feb or Mar 2022.
Sub Main
FileOpen "C:\Winfilm\Measure\PE-Lam9.scw"
End Sub
Fixed in 2.51.2063. If you can't
update, there's an equivalent workaround:
Sub Main
Macro "PARAMOPEN C:\Winfilm\Measure\PE-Lam9.scw"
End Sub
Need to integrate
FilmStar with Excel
or Word but have no idea what to do? Try
the following example. It will work without DESIGN being open.
In Excel access the
VBA editor (Alt+F11). Click Tools
References. You
should see FtgDesign1
listed as a Reference. Check this to add it to your
project. You will find it listed in the Object Browser with two
classes: clsBasic
and clsMain.
Now open a new module and try the following VBA program:
Sub Main()
Set dBasic = New FtgDesign1.clsBasic
Set dMain = New FtgDesign1.clsMain
k = dBasic.Macro("Fred;")
On Error Resume Next 'prevents error 440
dMain.Quit
End Sub
Now that you have a
working example, you will be inspired to Read
the Manual. Back to top
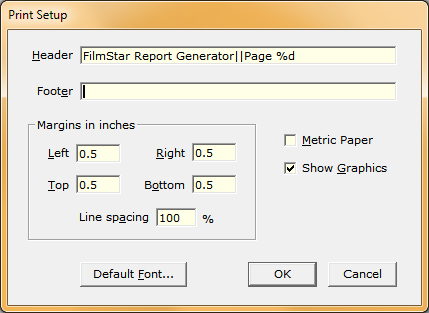
Graph not
displayed in Report Generator
A user reported that graphs
were not displayed when using template commands <<Graph>> or
<<FSPlot>>.
The problem was revealed in a screen-sharing session.
Margin values were very far off with Line spacing about
16000%.
The issue would have been impossible to resolve without
screen-sharing. |
|
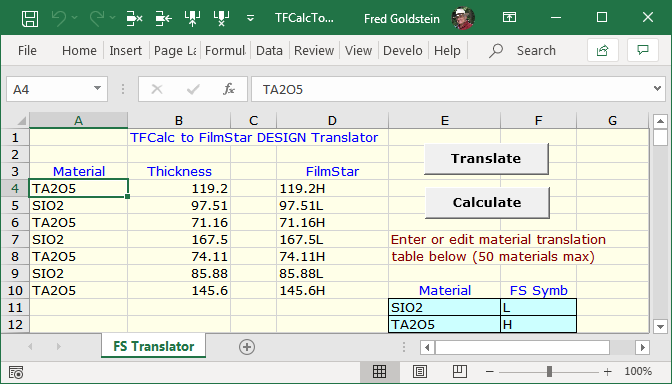
TFCalcToFS.xlsm
converts TFCalc™ designs to FilmStar format. The VBA code
is unsecured and can be modified for other thin film design
software.
Click the Translate button; a message box prompts you
to proceed or cancel. When pasted in Excel, a TFCalc design
is displayed in two columns as shown below (A & B). Next
click Calculate to plot in DESIGN.
Layer 1 (row 4) is next to the substrate (same as
FilmStar). If modifying the workbook for another design program
that might not be the case. The material
translation table (light blue cells specifies FilmStar Index
Symbols corresponding to TFCalc Material Names. Materials
import is discussed here. You
can use the same Symbol for multiple materials, e.g.
H for TiO2 & ZnS, assuming that the design does
not contain both. |
TFCalc *.mat materials files must first be converted to FilmStar *.itw
files (see
section below). Film
thickness
must be in nm; set FilmStar DESIGN accordingly in Setup Parameters.
Verify that the design is correct
by comparing results in both programs. When
comparing, be sure to
check the setting for Side 2
Compensation in Setup
Parameters. Wavelengths will not match if Inverse wavelength spacing was
selected in Graph Axes.
Excel aficionados:
DDE runs the following
macro sequence to calculate and plot the spectrum.
k& = DDEInitiate("Design1",
"Main")
DDEExecute k&,"DESIGNPASTE;AXESDRAW;CALCPLOT;"
DDETerminate k&
Unfamiliar with DDE (dynamic data exchange)?
It's a legacy Windows facility still supported and somewhat simpler to
implement than ActiveX. IsRunning("Design1.exe") ensures that DESIGN
is open.
Private Function
IsRunning%(p$)
'https://stackoverflow.com/questions/29807691...
Dim objList As Object
Set objList = GetObject("winmgmts:").ExecQuery _
("select * from win32_process where name='" & p$
& "'")
IsRunning = objList.Count
End Function
Back to top
FilmStar INDEX
BASIC programs TFCalcMatl.bas
(import single file) and
TFCalcMultMatl.bas (import multiple files) convert TFCalc™
material files (*.mat) to FilmStar n,k files (*.itw). It expects the
following format:
VERSION*1*
FORMAT*1*
POINTS*20*
DATA1*1*380.0*2.55*0.0*
DATA1*2*425.0*2.49*0.0*
DATA1*3*450.0*2.469*0.0*
Send us
samples of TFCalc .mat files which do not work properly, so that we can
modify the code
accordingly. The BASIC programs require INDEX 2.30.0201 or newer. Need help with FilmStar BASIC?
Click here for a tutorial and/or
contact FTG Software. Back
to top
PerkinElmer spectral
data files of different types (binary, ASCII, Data
Manager, PECCS) have the same .sp extension. How can the data be
utililzed in
FilmStar (Scantraq)? An easy option is to open the file in
UvWinLab and
re-store as J-CAMP (.dx extension) which can directly be opened in
FilmStar. If
this is not convenient, here are further options:
- Import binary
PECCS files via BASIC
subroutine
Sub
Pe19SpOpen
- Use programs
pe-sp1.bas, pe-sp2.bas (basic32.zip)
to import .sp ASCII files
- Convert .sp file
to J-CAMP (.dx) with PE
program pecnvrt.exe
The last choice can
convert multiple files. Copy the program to c:\uvwinlab.
New files are created in c:\uvwinlab\convert. Back to
top
|
|
The number of
built-in
dispersive Index Functions in DESIGN and INDEX was
extended in DESIGN 2.23.6001 and INDEX 2.23.2001. Not familiar with
Index
Functions? You begin in INDEX by fitting continuous dispersion
functions to n,k vs. wavelength data. Functions are then adjusted in
DESIGN
where further fitting explains differences between calculated and
measured
spectra.
Index
Tables (*.itw) stored with INDEX 2.23.2001
and newer will
be incompatible with earlier versions of DESIGN and INDEX.
1. Open INDEX and
click Functions...Built-in.
The functions which are
initially checked are those defined in previous versions of DESIGN and
INDEX. New functions are CYGEN, CYGENK2, SELL1, SELL1K1, SELL1K2,
SELL2, SELL2K1
and SELL2K2. As you scroll through the grid, note that equations are
displayed at the bottom. Consult these carefully if copying results
from
elsewhere.
|
Examples of Index
Functions based on TiO2 data sets will be found in
subdirectory c:\winfilm\index\functions. Start FilmStar INDEX and
temporarily
switch to this directory in File...Configuration...Directories
(remember
to switch back later). Open a file. Click Functions...Plot
to visually see the fit and Functions...Fit
Coefficients to review
numeric values. If you open an Index Table in INDEX (or FILM Archive
file in
DESIGN) which references a function not currently in the list of
built-ins, that
function is automatically added.
2. In DESIGN, the same
list of built-in functions will be found in the Film
Indices editor under Edit...Built-in
Functions.
3. Initial estimates
for highly nonlinear functions CYGEN and CYGENK2 may be
especially elusive. Depending on your data, there could be multiple
solutions
providing equally good fits. If you have difficulties with these or
with other built-in
or user-defined functions, send us your n,k tables (*.itw or Excel
format) as
e-mail attachments. Thanks to Steve Tuenge for suggesting function
CYGEN (Generalized Cauchy) which he has found very useful over the
years.
4. File and Edit menus
have been added to the User Index Function dialog. These include
facilities to load and save
Function Collections (*.itf) (see c:\winfilm\index\examples.itf). Note
that a
Function Collection is actually the [UserIndex] section of
c:\windows\design1.ini. An important use is transferring Index
Functions to
other users.
Be
sure to backup (save as a Function
Collection) any functions
that you are using before opening a new Function Collection.
The Edit menu lets you
delete functions and alphabetize function names.
5. File aconst.itw can
be used to test the following Index Functions included
in examples.itf: ACONFM
(uses formula), ACONVB
(uses FilmStar
BASIC program aconst.bas), ACONWS
(uses FilmStar Workbook indxfnc.vts), ACONXL
(uses Excel indxfnc.xls via DDE). Back to top
IndexSolve.bas
(in
c:\winfilm\basic32) creates index tables from
multiple spectra via DESIGN's DLS refinement algorithm.The tables is
then pasted into INDEX. As an example, we
simulated measured spectra of 50 nm Ag on
1.52 substrate at 6 degrees and 45 degrees P and S polarization.
Relevant FILM
Archive and sample files are found in indexsolve.zip.
Copy FILM
Archive
files to c:\winfilm\designs and spectral data
to c:\winfilm\spectra. IndexSolve1.faw creates spectral files and
IndexSolve2.faw is utilized when running IndexSolve.bas. Once it is
determined
that IndexSolve.bas works as expected, it is most instructive to repeat
the
calculations with spectral noise added. This is accomplished via
FilmStar BASIC
program AddNoise.bas. Back
to top
The following FilmStar
BASIC code generates an index (n, k) vs wavelength table and
copies it to the clipboard. Back to top
Sub Main
Dim w!, xn!, xk!, s$
Row% = 4 ' Row in
Film Indices dialog
For w = 400 To 700 Step 10
GetIndex Row, w, xn, xk
s$ = s & CStr(w) & vbTab & CStr(xn) &
vbTab & CStr(xk) & vbCrLf
Next w
Clipboard s
End Sub
Invalid
license type error
Reinstall
FilmStar to eliminate the (Jan/Feb 2021) error. If that is not
possible (passwords out-of-date), try this quick fix (hopefully
permanent) in
C:\Winfilm\Config\common.ini. Contact FTG Software if that
doesn't work.
[Install]
License=USB
Back to top
Invalid procedure call or argument (INDEX Calculate n,k
dialog)
Bu default, INDEX 2.51.0524 reviews spectral
data before calculating n,k in order to prevent the Invalid
procedure... message triggered by invalid data: %R
or %T < 0, %R + %T > 100%. While this prevents common errors
it does not guarantee that data are otherwise valid. The feature can
be disabled in Solve...Spectrum Type
Back to top
We suspect there are
firmware discrepancies in these instruments. If
your Lambda 40 (or similar) times out during background correction, try
adding
the following line under [Configuration] in
c:\winfilm\config\measure.ini
or c:\scantraq\config\scantraq.ini
Exit and restart
before testing.
[Configuration]
Lam40AZSCStatus=2
If your Lambda 2 or 20
(or similar) times out during background correction, try
the following line:
Lam40AZSCStatus=1
Please contact
us about this. Back to top
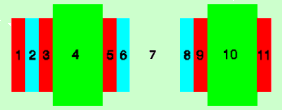
Expert mode OFF
automatically selects common beam filters as shown below (default mode
for PE UVWinLab).
PE Lambda 900
Index
Filter Wave
Type
1
10
3350 T-LPQ-2.5
2
9 2620.8
T-LPQ-1.5
3
8 1670.4
T-LPQ-1.0
4
7 1190.4
RG780
5
6
810.4 RG665
6
5
690.4 OG550
7
4
562.4 BG38
8
3
379.2 UG11
9
2
319.2 T=100% (no filter)
10
1
150 Glass
PE
Lambda 800
Index
Filter Wave
Type
1
7
950 RG780
2
6
810.4 RG665
3
5
690.4 OG550
4
4
562.4 BG38
5
3
379.2 UG11
6
2
319.2 T=100% (no filter)
7
1
150 Glass
Expert Mode OFF is
equivalent to Expert Mode ON with the default filter program built into
MEASURE (Scantraq). Note that Expert Mode ON is now required for
selecting a single filter for the entire scan (not
recommended). Back
to top
A user reported Error -241 "Hardware missing" after PerkinElmer
replaced a board in his
Lambda 900. The error is spurious (PE bug?) and, by default, ignored in MEASURE
2.51.1861 and newer.
In the unlikely event that the error arises from a different cause
requiring the scan to abort, enter the following under [Configuration] in Measure.ini or
Scantraq.ini:
[Configuration]
AbortOnErrN241=-1
Back
to top
Lambda
Server error (950/1050)
A user reported Lambda Server
error: Could not connect to instrument - Object variable or With
block variable not set. The problem followed network security
updates when IT failed to restore the necessary user-permissions.
Restoring permissions resolved the issue. This problem can arise in
Mpe950.exe and Mpe1050.exe which both utilize MSLambdaServer.exe.
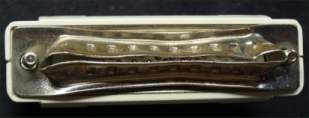
New computers lack the LPT
(parallel) printer port and cannot read HASP LPT keys. Since adding
an
adapter card does not work, keys must be exchanged for USB
types. Pricing is nominal, but current support is required.
After installing and testing new
keys, do not
return old keys! Please e-mail a photo of the destroyed key(s).
We suggest squeezing the plug with pliers as in the above picture.
The same applies to damaged USB keys. If damage is not obvious,
squeeze or break off the metal section with pliers. USB keys may be
damaged when not removed from laptops. If you tend to forget about
the attached key, check USB key shut-down warning in DESIGN
File.. Configuration.. Security.
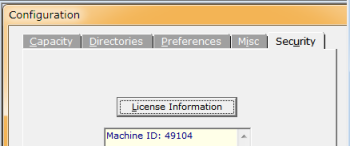
We can quickly supply a temporary software-based license
while you wait for your new USB license key to arrive. Click
Retry <License Information> and provide us with your
Machine ID.
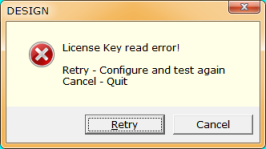
We can quickly supply a temporary software-based license
while you wait for your USB license key to arrive. Click
Retry <License Information> and provide us with your
Machine ID.
The Machine ID is also displayed in Excel workbook
HaspTest32S.xlsm:
|

Hasp found
|

Hasp not found |
Back to top
Log
files
(MEASURE/Scantraq)
A running log of
input/output activity can help us debug problems in data
acquisition. A log file is enabled by adding a line similar to the
following
under [Files] in
c:\winfilm\config\measure.ini
or c:\scantraq\config\scantraq.ini
[Files]
IOLog=c:\winfilm\cary500.log (or c:\scantraq\cary500.log)
This adds a new Test
menu to MEASURE/Scantraq
containing item I/O Log Open.
When this item is checked instrument commands and responses are stored
in the
specified file. Since new data is appended, the file can be used
repeatedly. Uncheck to close and disable the log file. E-mail
the file to us for analysis and
add the exact wording of any error messages.
When no longer
required, the Test menu is removed by deleting the IOLog entry, or
(preferably, since you might need it again) by commenting it out by
prefixing the entry with a semicolon, that
is ";IOLog= etc". Back
to top
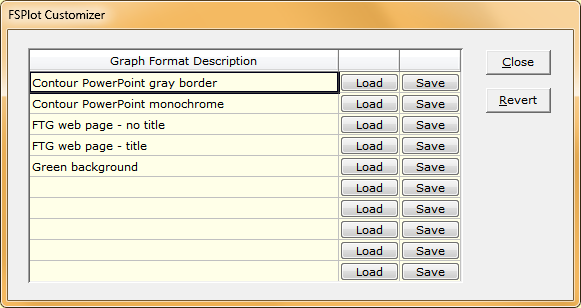
A bug has been found relating to
MEASURE format settings. Really minor, but potentially puzzling. It
mostly affects the few users who take advantage of FSPlot
File..Customize in FSPlot whereby you save and recall graph format,
say for PowerPoint, web pages, etc.
BUG: Entries that should
have been saved in ..\Winfilm\Config\Common.ini were saved in
..\Windows\Win.ini. By saving in Common.ini you have common formats
in DESIGN and MEASURE. The bug was fixed in MEASURE 2.51.1930 (30
Oct 2018).
Repair: Edit ..Windows\win.ini (Notepad) and transfer the
following sections to ..Winfilm\Config\Common.ini
[Collector]
...
[Interface]
...
[GridEnhColors]
...
[PlotModule]
...
[Spectrum2000]
; Probably no one is still using this ancient FTIR
...
Complication: If DESIGN is
on the same computer, add any [PlotModule] entries to the ones
already there. These correspond to the screen image above:
FormatR=PlotConfig 8742977,
332128, 0|PlotSize...
Format0=Contour PowerPoint gray border\\PlotConfig...
Format1=Contour PowerPoint monochrome\\PlotConfig 8458449...
Format2=FTG web page - no title\\PlotConfig 8461521, 2128...
Format3=FTG web page - title\\PlotConfig 9265225, 102128...
...
Format9=
In this case where DESIGN and
MEASURE are on the same computer, the first two entries refer to
DESIGN; the remainder to DESIGN and MEASURE.
DESIGN handles mixed
materials via User Index Function Mixed.
Here a
formula expresses the final index as a function of constituent
dispersive
indices. A linear mixing model would be expressed as
n = A*N1+(1-A)*N2
k = A*K1+(1-A)*K2
where N1, K1 are
indices for material 1 and N2, K2 are indices for material
2. Here A
is the mixing fraction (which can be treated as an optimization
variable). Calculated results for TiO2+Ti are illustrated below. Please
note
that no claim is being made that a linear model is realistic; more
complex
relationships are easily programmed.
Porous TiO2
films with
packing density < 1 can be simulated by mixing
film materials with
material Void,
where Void is an index table containing values 200 nm, n =
1.0; 1000 nm, n = 1.0; 5000 nm, n = 1.0. Users should verify that
results are
reasonable; the following program illustrates a
method for viewing index values.
Sub Main
Dim fmt$, w!, xn!, xk!
Const f$ = "0.00000" ' Format
For w = 400 To 800 Step 50
GetIndex 3, w, xn, xk ' Material 3 (first film) in
' Film Indices editor
Debug.Print CStr(w) & ", " & Format(xn,f$) & ",
" & Format(xk,f$)
Next w
End Sub
Back to
top
If you find the mouse
pointer disappearing in the main graphics window, try setting Control
Panel.. Mouse Properties.. Pointers to a different scheme. We recommend
Windows Inverted which, in our opinion, offers the best contrast no
matter what the background. Back
to
top
At first it appears
that there is no way to use OCXs (ActiveX components) in FilmStar
BASIC. While you cannot add a component to the BASIC UserDialog Editor,
you may be able
to use the OCX as an object.
This is illustrated in the following code snippet
which records temperature from an Omega DPi32 thermometer. The ActiveX
module
iSeries10.ocx is provided by the manufacturer.
Sub Main
' IMPORTANT: be sure to add reference to
iSeries10.ocx
Dim iDevice As Object
' Found the object name in the Registry
Editor
Set iDevice = CreateObject("iSeriesAlpha10.iDevice")
With iDevice
.ServerCommPort=1
'
set COM port
Debug.Print .LastData ' read thermometer
End With
Set iDevice = Nothing
End Sub
That's all there is to
it. You do, of course, lose any graphics provided by
the OCX, but very often you really don't need that anyway. Back to top
When measuring
reflectance your Baseline scan attempts to compensate for the
reflectance attachment. Typically the scan is performed with no optic
(or a 'black sample') on the attachment. WHAT
YOU DON'T WANT TO DO is check 'Block sample beam during Baseline scan' (or
similar label in older versions).
This option can be found in PE 983, PE Lambda 800-1050 Scan Method
dialogs and is generally intended for transmittance measurements.
|
ZOOM allows us to view your computer. This is often
the fastest way to
resolve issues, and very often the ONLY way. |
We solve
problems by reproducing them with data files sent to
us as e-mail attachments. The body of the e-mail should also include a
clear statement of
the problem, exact wording of
error messages, etc. Users with expired annual support may be required
to renew.
DESIGN...Enable FILM Archive Mode (File Menu) so
that designs and parameters are stored in one file (*.faw,
c:\winfilm\designs). Attach the file to your e-mail. There are two
choices if your design includes dispersive materials:
1a. Attach ALL index
tables referenced in Film Indices (*.itw, c:\winfilm\index). If the
problem can be reproduced with constant indices there is no need to
attach index tables. Attach
all tables (*.itw) listed in Setup.. Film Indices, even
if not used in the design. (Simplify by first deleting unused
material names.)
1b. Recommended alterative: if
using
only dispersion tables (not dispersive functions such as
Sellmeier and Cauchy), enable Archive n,k Data
(File Menu) which embeds dispersion data in the FILM Archive
file.
THIS IS THE BEST WAY TO DEAL WITH DISPERSION.
2. If using a
Wavelength List (*.wls) or Wave/Angle List (*.wal) add that as well. As
an alternative to a Wavelength List (often used with CIE data),
consider using Wavelength Range instead.
3. If you have Subscript
out of range errors it is likely
that you need to increase values in File.. Configuration.. Capacity.
These values are stored in ..\Winfilm\Design1.ini which you could
attach to your e-mail.
MONITOR...Upon exiting MONITOR or clicking File...Save
All four work.* files are
stored in c:\winfilm\monitor. Attach these files zipped into one file.
Add index tables referenced in Film Indices.
Alternatively attach
the four files referenced in File...Save
As. The FILM or FILM Archive
file is stored in c:\winfilm\designs and the other three files are in
c:\winfilm\monitor.
BASIC...Attach a short code snippet showing your problem. Isolate the
problem in the simplest code possible.
Long complex programs may entail extra charges.
Spectra...Attach any spectral data files being
utilized in DESIGN or INDEX. Or send an Excel .xls file (zipped please)
with data pasted therein. If you don't have FilmStar MEASURE, there are a number of options
to create data files. See the winfilm\basic32 directory for support for
Shimadzu and other spectrophotometers.
Excel...Problems in running FilmStar (server) from Excel (client) or
vice-versa cannot be analyzed with "it doesn't work." Please
attach the Excel file (.xls or .xlsm) and any FilmStar files
required for us to reproduce the problem. VBA code copied and
pasted into your e-mail is insufficient! The amount of help
provided as part of annual support is at our discretion. This
may be useful: Excel (as
Client) Reliability.
Please include program
version number. This is found by clicking
Help...About. If the program absolutely does not open at all, you can
get the
version number by right clicking the file name in Windows Explorer.
Users
occasionally report problems that are already fixed. Before contacting
us, consult the FilmStar Revisions
History page to
determine whether a newer release fixes the problem.
In some cases it is
useful to attach screen images.
This is accomplished as follows:
- Copy the active window
to the clipboard with <Alt+PrtScr>
(<PrtScr> by itself copies the entire screen.)
- Paste into a graphics
program which can store in GIF or PNG format.
- A recommended alternative is to
paste images into a Word or Excel attachment; several images can be pasted into a single document.
- Do
not send graphics
in .bmp format! Back to
top
You need to supply QA data in Excel
format and have developed a workbook for the purpose. When you
re-save the workbook it includes VBA code as well as extraneous
worksheets. What you really need to do is save data only as an Excel
workbook without your proprietary VBA code. Is there a way to do
this without re-saving the original workbook?
Consider workbook QAFilter.xlsm which creates two data sheets:
Spectra and Results. In the following the sheets are
selected and saved to a new macro-free XLSX file. The original
QAFilter.xlsm is unaltered and may be saved as read-only
(recommended) for further security.
Sub SaveScan(Byval PartNum$)
On Error Resume Next
Sheets(Array("Spectra", "Results")).Select
Sheets(Array("Spectra", "Results")).Copy
ActiveWorkbook.SaveAs Filename:="C:\Winfilm\Spectra\" &
PartNum$ _
& ".xlsx", FileFormat:=xlOpenXMLWorkbook,
CreateBackup:=False
ActiveWorkbook.Close SaveChanges:=False
Windows("QAFilter.xlsm").Activate
End Sub
In the case that only
one worksheet needs to be save, remove the Array statement as in
Sheets("Spectra").Select
File...Print Graphics
creates a graph in the Report Generator that is supposed to fill
the page. A user asked "Is it possible to reset the value for my Report
Template when
I am printing graphics in DESIGN? The current setting in the template
is <<Graph
83>> and I would like to have this reset to default to
<<Graph 130>>.
Any advise?"
Default relative graph
size can be changed in the Configuration dialog
Misc tab. Another approach is to use a BASIC program to set the size to
a
particular value.
Sub Main
t$ = Template
' save
current template
Template = "<<Graph
130>>"
k = Macro("ReportShow;")
Template = t$
'
restore saved template
End Sub
This can be assigned
to a macro key. Back
to top
SchottFilter.zip
(2.4M) contains the installer for the Schott filter glass program Filter
'98
that was originally available on SchottGlassTech.com.
Back to top
Subscript out of range error
This common error can usually be
fixed by increasing capacity in File..Configuration..Capacity.
The error occurs in FTIR/OOI Servers (Processed Data) when there are
excessive points in the Standard file. Fix: Using Notepad, increase
StdCapacity in ..\Winfilm\Config\FtgServer.ini as follows:
[PE Spectrum 10]
StdCapacity=10001
After restarting the error message should disappear. We recommend
Notepad++ (free) as an
alternative to Windows Notepad. Maximum capacity is 32K.
Back to top
If decommissioning an
old computer or reinstalling Windows, first copy all Winfilm (Scantraq) subdirectories to a USB memory stick. Then install FilmStar (Scantraq) on your new
computer. You next need to transfer data files and custom settings. The following assumes that FilmStar
(Scantraq) programs are located in C:\Winfilm (C:\Scantraq) on both computers; if not, adjust
paths accordingly.
-
Install
from
files/setup32.exe
or, if FilmStar support is not up-to-date, from the latest version
on your hard disk, probably in your Downloads directory. Installation
passwords are found at the bottom of the FilmStar News e-mails. If support is
not current, check old FilmStar News e-mails for passwords corresponding
to the installer's date. Installation
issues are discussed
here.
-
Copy C:\Winfilm (C:\Scantraq) subdirectories from
your old
computer to the new; do not copy programs directory
C:\Winfilm (C:\Scantraq).
-
Can't open designs
with missing n,k tables or user-defined functions? Check 'Can
open designs...' in File.. Configuration.. Preferences.
You can then import designs and later repair index values.
Note: Attach your USB Security ID Module
after installing FilmStar. This ensures that Windows
plug-and-play will find it If you have a very old copy of FilmStar you may
need to contact us. Back to top
|