Technical Issues - FilmStar News 2011
Other editions:
2006, 2007, 2008,
2009, 2010,
2012, 2013 January 10 FilmStar Database Capacity
February 9
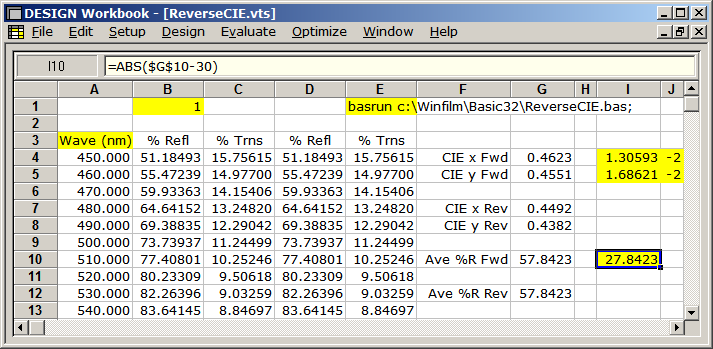
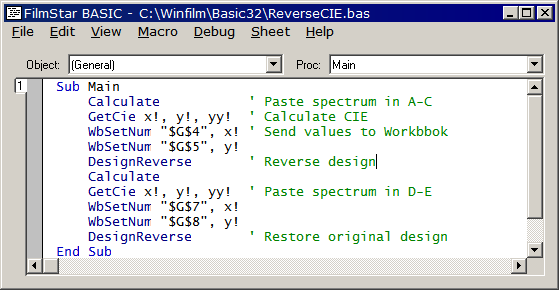
Designing for FWD and REV Light Incidence A user recently asked whether it is possible to optimize coatings for both forward and reverse light incidence. A typical application is architectural windows. 1. In such cases the design must include a massive layer. In the Film Indices dialog AIR=1, SUB=1 and the substrate is defined as a massive layer. Search for 'Massive' in DESIGN's help to refresh your memory. Multiple massive layers with coatings on some or all surfaces are supported. 2. Reverse reflectance targets (% R Rev) are available in Optimization Targets, but they may be of limited use in architectural coatings which are better specified by integrated criteria. 3. The FilmStar Workbook provides means to evalulate and optimize designs according to complex multiple criteria. One might want to maximize CIE Y in transmittance while constraining reflected color. There may be thermal considerations such as absorptance, emittance. Our first task is to compute required values (%R, %T, CIE, etc.) with light incident from two directions. In example ReverseCIE.zip, column B displays Side 1 Fwd reflectance, D shows Side 2 Rev reflectance. Copy ReverseCIE.bas to c:\Winfilm\Basic32 and ReverseCIE.vts to c:\Winfilm\Workbook. Datamarker cell $A$3 defines the upper left corner of the data columns. These and other special cells are discussed in DESIGN help under Defined Names. Starting with ReverseCIE.faw, click <Ctrl+O> to set Ave %R Fwd ($G$10) to 30% with equal forward and reverse CIE color coordinates.
Note how the command in Macro cell $E$1 automatically executes during each iteration. As shown below, the macro rewrites spectral values (450-750 x 10 nm) and computes color coordinates.
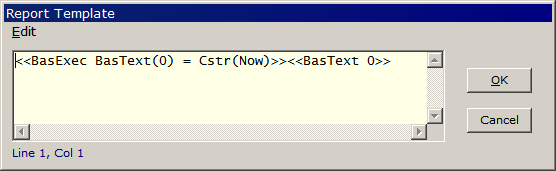
4. It is possible to replace simple BASIC programs with a single line BasExec command as follows:
Sub Main and End Sub are automatically added. In the case of more complicated programs which might include subroutines, save as .bas and use macro command BasRun.
5. The Workbook might be the most
powerful underutilized feature in FilmStar. Please contact FTG if you
require an online tutorial
or if you would like us to set up the Workbook and BASIC macro for you. This topic is covered in short course
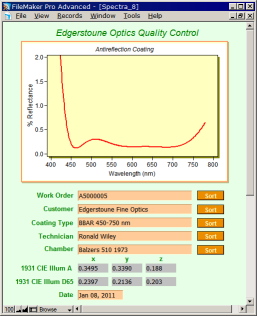
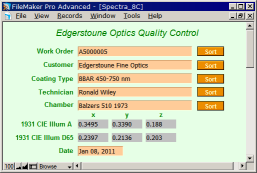
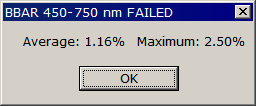
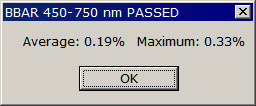
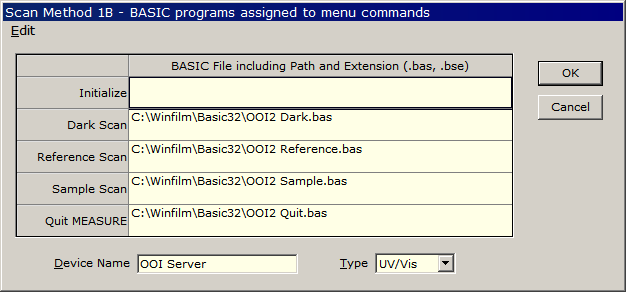
Maximizing FilmStar. February 14 FilmStar Hidden Workbook The FilmStar Workbook can be opened as a hidden object in DESIGN and MEASURE. This powerful but obscure capability automates Workbook calculations. It is especially useful in MEASURE QA procedures because it helps eliminates the possibility of modifying measured data. The example below utilizes QCBBAR.xls included in the FilmStar installation. The hidden Workbook is opened in DESIGN or MEASURE BASIC by WsOpenHidden. The complete path name is required. QCBBAR.xls expects data in the range 450-750 x 10 nm.
Why not calculate average and maximum in FilmStar BASIC? Typically these require For...Next loops in BASIC but only simple functions in the Workbook. Simplification is even more profound for calculations requiring multiple spectra, weighting functions, etc. Since Workbook models utilize a fixed number of data rows, care must be taken to ensure that the model matches the wavelength range. As a simpler but less flexible alternative, MEASURE BASIC Sub AveCalc returns min, max and average values independent of the number of data points. February 22
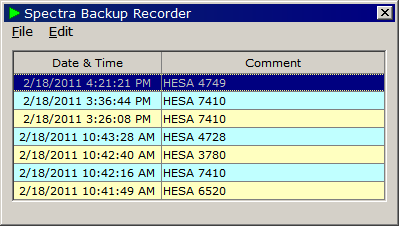
MEASURE Spectra Backup Recorder
Highlight rows
and press Delete to delete one or more entries. File menu
commands also delete entries. Entries are saved when the Recorder is closed.
The Recorder dialog can be sized and positioned. Spectra are stored in C:\Winfilm\SpcCache.
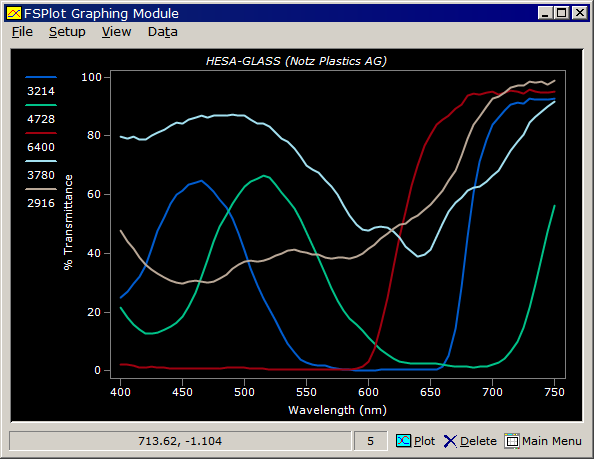
In this example we measured HESA-GLAS (Notz Plastics AG) color filters with
an Ocean Optics USB2000. Click File.. Options.. Consolidate to
renumber files, thereby reducing record count. Should the Recorder listing become out-of-sync with
spectra (*.spc) in SpcCache, click File... Delete All Rows to
reinitialize. Click File.. Options.. Settings to adjust Recorder
capabilities; each check box includes tooltip text explaining its action.
Test data provides means to test and verify Recorder operation. Note changes in SpcCache\*.spc and in Records.txt. Delete rows and observe the consequences of File.. Options.. Consolidate. The following BASIC program inserts test data in the Recorder:
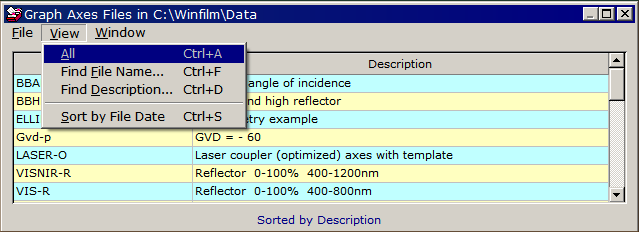
March 7 File List Update FilmStar File List dialogs, enabled by checking Display and save file descriptions in File.. Configuration.. Preferences, have been updated with new Find and enhanced Sort capabilities. This is especially useful for long-time FilmStar users who continue to save designs and other files in 8.3 format.
A detailed discussion of the various FilmStar
file Open/Save options can be found here.
April 1
Multiple Instances (Sessions) FilmStar programs allow multiple instances (sessions). While working on a design you might need quick information about a second design. Rather than close DESIGN, open it again to create a second instance. What has been added today is an Instance counter as indicated in the program title by '(2)'.
There are a few cases where multiple MEASURE
instances might lead to trouble, such as versions utilizing ActiveX EXE
libraries (i.e. Mpe950.exe). Two features are disabled in second and
subsequent instances: Design Recorder (DESIGN), Auto Backup (MEASURE). May 16
MEASURE Enhancements 1. MEASURE/Scantraq 2.51.1150 include new FSPlot (SQPlot) refinements. Select Line Type = RGB (D65) to plot curves in RGB color. This requires that the scan range be 380-780 x5 or x1.
Note that legend line thickness matches plot line thickness. This option (also in DESIGN) is enabled in Setup...Legends by checking Simple line. When unchecked the default thick expanded line is drawn. As requested by a user characterizing dyes, multiple peaks can be automatically labeled. Threshold and Wavelength Range settings help eliminate spurious peaks. Check Copy to copy peak values to the Windows clipboard. in Excel format. This dialog is found in FSPlot Setup...Peaks. To calculate and display peaks, it is also necessary to check View...Peaks. NOTE ADDED 26 Feb 2018: A revision adds the ability to plot peaks and/or valleys. Click here to learn more.
The plot below shows typical results.
2. MEASURE/Scantraq users will now find that the full scan range is displayed during data acquisition, even if the final range is smaller. In the above the scan range is 380-780 nm, giving a temporary range 300-800 nm while scanning before displaying the final graph range 450-650 nm. 3. When using Mpe983.exe to run Ocean Optics or similar server-based instruments, a macro is typically assigned to the <Scan> button. This resulted in a hangup when a second macro called Sub Scan. This subtle issue has been addressed, but users might also prefer alternatives: 1. Directly call the server (not calling Sub Scan) 2. Manually click <Scan> followed by a macro (attached to a button) processing the spectrum, 3. Include processing in the Sample Scan macro tied to the <Scan> button. It all depends on work flow; for example, option 2 makes it possible to view the spectrum before processing.
To summarize the problem, assuming that the <Scan> button is assigned to a macro (as shown above), running the following BASIC code could hang MEASURE. This has been fixed.
4. Scan Method files (*.scw) saved with 2.51.1150 are not
compatible with older versions. May 23
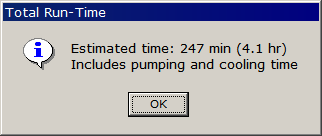
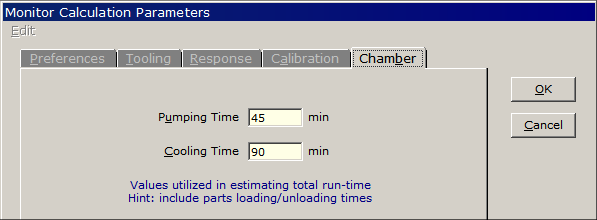
Coating Run-Time in MONITOR
In addition, a new Chamber tab provides means to add pumping and cooling time:
July 5
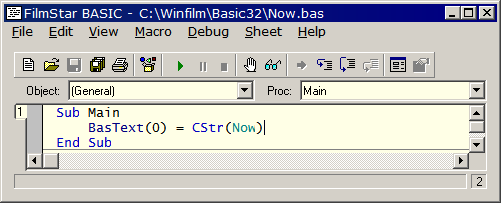
Including Date/Time in a FilmStar Report A user automating QA procedures asked how to include the date in a FilmStar report. Our recommended procedure involved two Report Generator commands: BasRun (run a BASIC program) and BasText (insert text). The BASIC program shown below assigns date/time to string variable BasText(0).
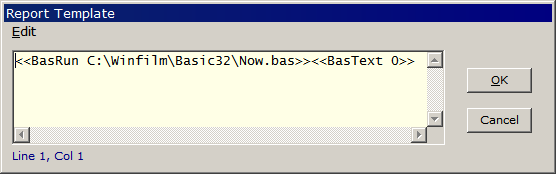
In the Report Template <<BasText 0>> retrieves and prints the value of BasText(0). Note that the BasRun command must precede the BasText command since the value must be assigned before it can be utilized. (BasText need not be on the same line.)
Finally we see the desired result in the Report Generator:
Realizing that the procedure could be
simplified by including BASIC code directly in the Report Template,
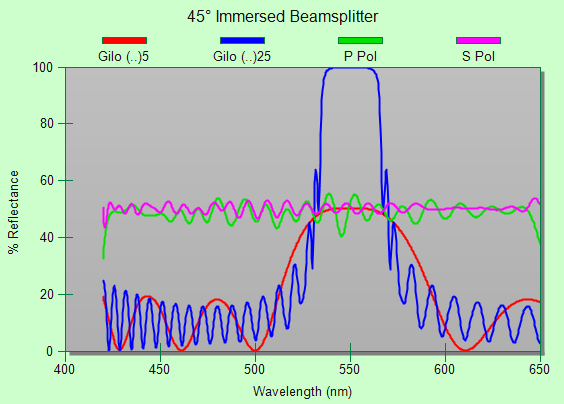
Should Windows date and time settings be unsuitable, FilmStar BASIC provides several customization functions. Replacing Cstr(Now) with the following gives 01-Jul-2011. Format$(Day(Now),"00")&"-"& MonthName(Month(Now),True)&"-"&Cstr(Year(Now)) October 4 Immersed Beam Splitter In his paper Design of a nonpolarizing beam splitter...(Appl Optics 31, 5345-5349, 1992) Mordechai Gilo used SUB (1.131H 1.33M 1.594L 1.33M)5 SUB [SUB 1.52, L 1.38, M 1.63, H 2.3, W0 550 nm, Angle 45°] as the starting design for an all-dielectric nonpolarizing beam splitter in the range 520-580 nm. Gilo optimized the design with FilmCalc software, a previous DOS version of FilmStar. Increasing the repeat factor from 5 to 25 we obtained a 99 layer beam splitter in the range 420-650 nm.
October 12
User-Defined Functions October 31
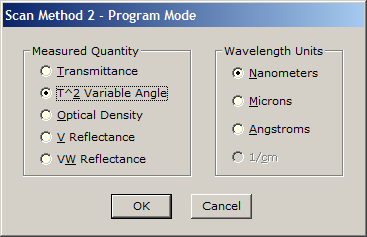
Measure Enhancements 1. MEASURE 2.51.1300 adds a T^2 mode
supporting variable angle transmission accessories such as those
manufactured by
Harrick.
In this accessory two identical witness
samples are mounted at opposing angles so as not to displace the sample
beam. The transmittance is the square root of the measured value. The
Reference measurement is performed with an empty accessory. This mode
requires two identical witness samples and does not apply to the case
where one optic
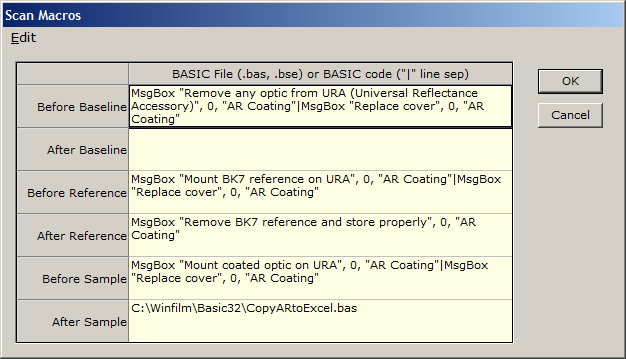
is coated and the other uncoated. 2. Scan Macros (Setup menu) make it
possible to run BASIC programs before and/or after Baseline, Reference, and
Sample scans. Potential uses include prompts to check the sample
compartment scanning, copying data to Excel, etc. This is an excellent solution for partial automation and an
easy way to add 'what to do
next' instructions in any Windows supported language.
Macros are specified by file name.
Alternatively, as shown, code can be entered directly. This is recommended
for simple macros (224 characters max) with only a main subroutine. Sub
Main and End Sub are automatically inserted, and the pipe character
"|" can be used for line separation. DO NOT USE Scan Macros
when scanning with BASIC Sub Scan. November 17
Optimizing Phase Shift, Switching Axes A user requested assistance with a
design containing both Ø T (phase in transmission) and %T targets. This
raised a number of issues, some subtle, addressed below. 1. It is indeed possible to optimize
phase and transmittance targets simultaneously. In the target dialog the
ability to sort targets by Type (Edit.. Sort) is handy. When
reviewing and editing, try clicking Edit.. Merge Cells to hide rows
with adjacent identical values. This can help identify erroneous entries. 2. During optimization DESIGN must
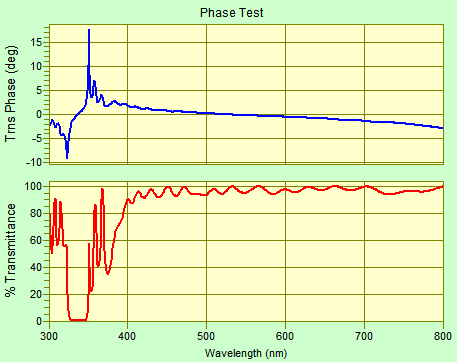
be set to plot phase. The reason is clear in the following graphs.
Differences ~360° become differences ~0° when appropriate axes are selected.
Assuming targets of 0° phase difference, the merit at the left is 4.1E+6
while the merit at the right is 2.3E+2.
3. Switching between phase and %T modes
is simplified by saving and opening Graph Axes independently of designs and
targets. This is readily accomplished in historic FILM Mode where five
component files define a coating design. In FILM Archive Mode a design is
defined by a single file, but components can still be opened and saved. A
stop-by-step approach is given below.
4. Phase and transmittance can be plotted simultaneously in the Interactor. In the Interactor Options box select Mode = Design and Type = Double plot. Here Vert Axis = Automatic.
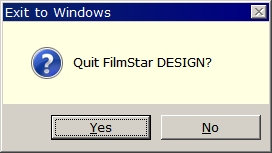
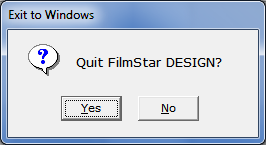
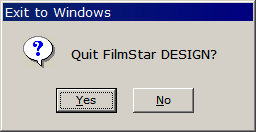
November 22 Message Boxes Message boxes are small dialogs with OK/Cancel, Yes/No and similar buttons. FTG programs now include enhanced choices in File.. Configuration.. Preferences. (DESIGN 2.61.2231, MEASURE 2.51.1311)
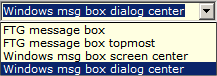
Message boxes follow the appearance settings shown below. Message boxes can be centered in the screen or in the active dialog window. Dialog centering is especially recommended for wide screen monitors.
FTG message boxes are dialog-centered and can be set topmost. Topmost messages are visible even when covered by another program. This is useful in automation. During a long MEASURE scan a technician might browse the Internet or play a computer game, thereby covering MEASURE messages. If topmost is set, the message box remains visible. To get FilmStar/Scantraq BASIC messages to be dialog-centered
To set topmost message box behavior in BASIC
Code for a self-closing message box with no button:
Code for a message box that closes in 10 seconds if <OK> not clicked:
What's the technical difference between Windows and FTG styles? Windows boxes are built into the operating system while FTG boxes are custom dialogs. Windows buttons are in local languages while FTG buttons are in English. Our own (default) preference is Windows...dialog center. |
.png)


Copyright © 2023 FTG Software Associates
Last updated on
January 31, 2023